With all the ridiculousness on the internet these days of people “stealing” photos and claiming them as their own, I thought it might be helpful to share how to watermark your photos with your logo or text for a better chance at preventing them from being victimized. It’s sad to HAVE to do this to your photos for fraud prevention because, in some cases, the watermark interferes with a photo’s message. On the positive side, if you like advertising your work, this is a great way to do just that.
If you browse the web for tutorials you’ll notice there are many ways to add watermarks to your photos. I’m going to explain how to do one method I find extremely quick & useful: creating a Photoshop Brush. I love using this technique because I can change colors, opacity and especially the size of the watermark at the click of a button.
It seems I have trouble keeping things short and sweet therefore I have separated this Tutorial into two parts.
The easiest starting point, if using a logo, is to use a vector based image with a transparent background or you can use text as your watermark. If you have a logo in jpg format or another format that has a solid white or other color background it would probably be best to use text instead. I’ll be using my logo in this post. In Part 2 I’ll explain how to make a brush using text and I’ll hit on how to possibly get around the jpg or solid background problem. So, are you ready?
NOTE: I’m using a Macintosh computer but these steps should work on a PC as well. Let me know if you have any trouble.
1) We need to start by creating a silhouette of the logo (solid black image.) I’m going to assume you have a logo that is mostly solid colors. Open your .eps or .pdf image from within Photoshop.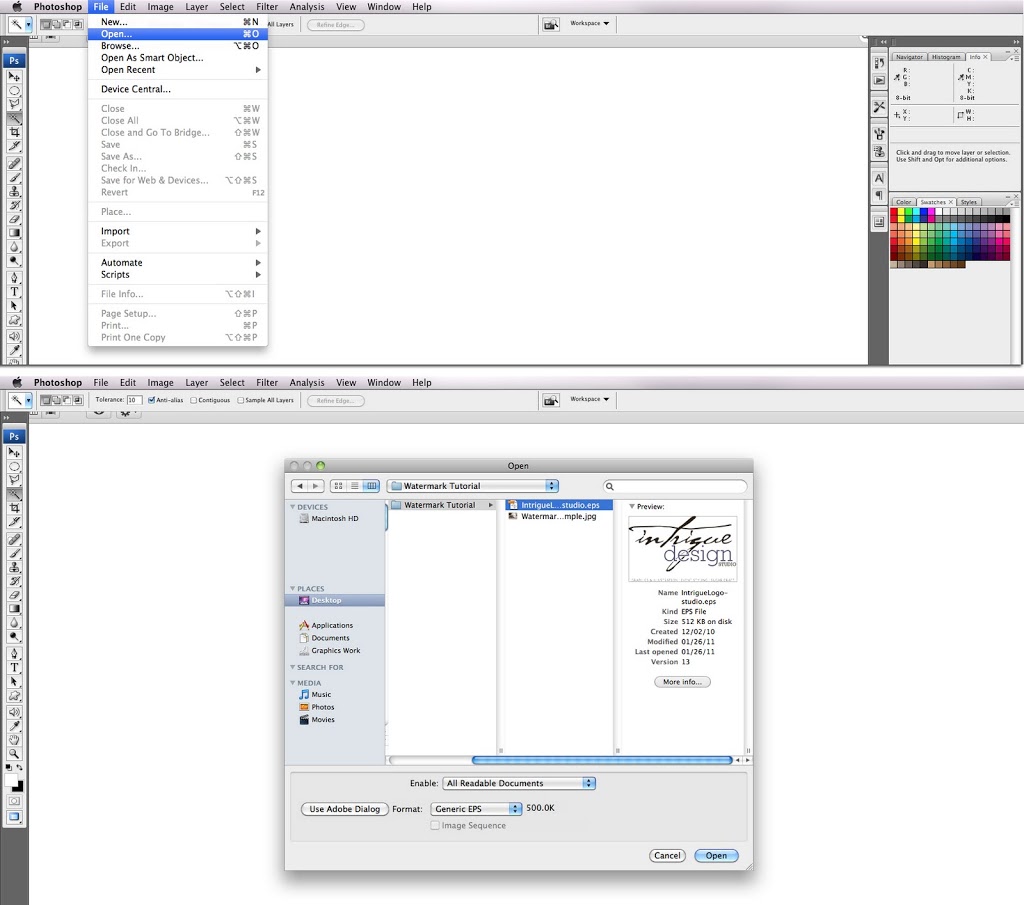 2) Make sure your “layers” palette is visible (Window->Layers) and look to see if the layer is called “Layer 1”, not “Background.” If it says “Background” it’s probably not transparent and that will add some steps to the process. I will hit on this in Part 2 of the tutorial.
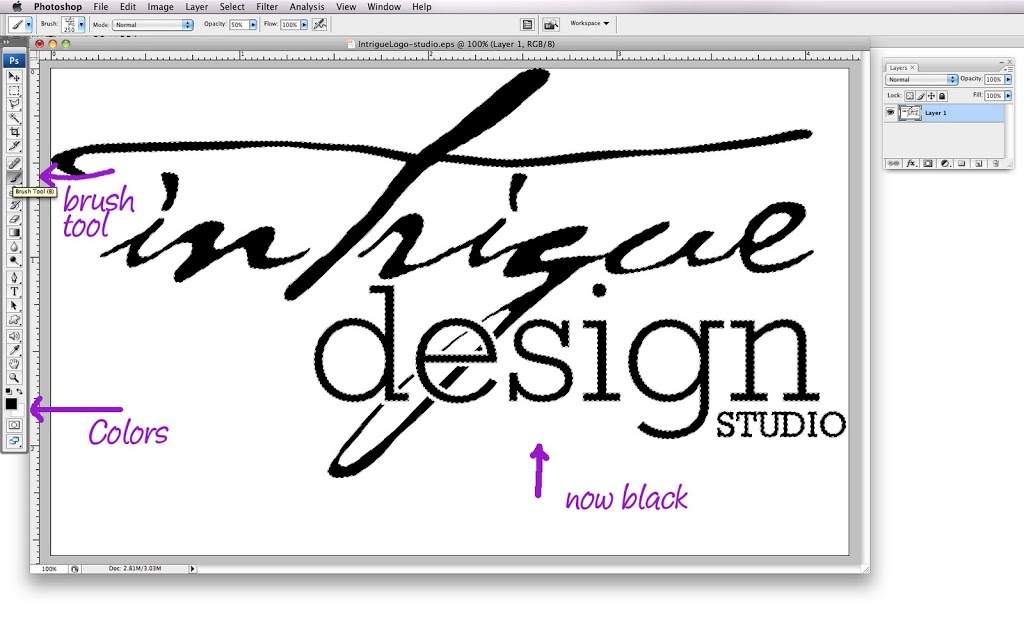
3) While holding down the command key use the mouse to click on the thumbnail of the layer in the Layers palette. Your logo should now be surrounded by a marquee. (This will become your watermark.) If there is one big outline with no particular details picked out, you might need to adjust some of the colors before selecting the layer. Again, I’ll show some examples of this later on.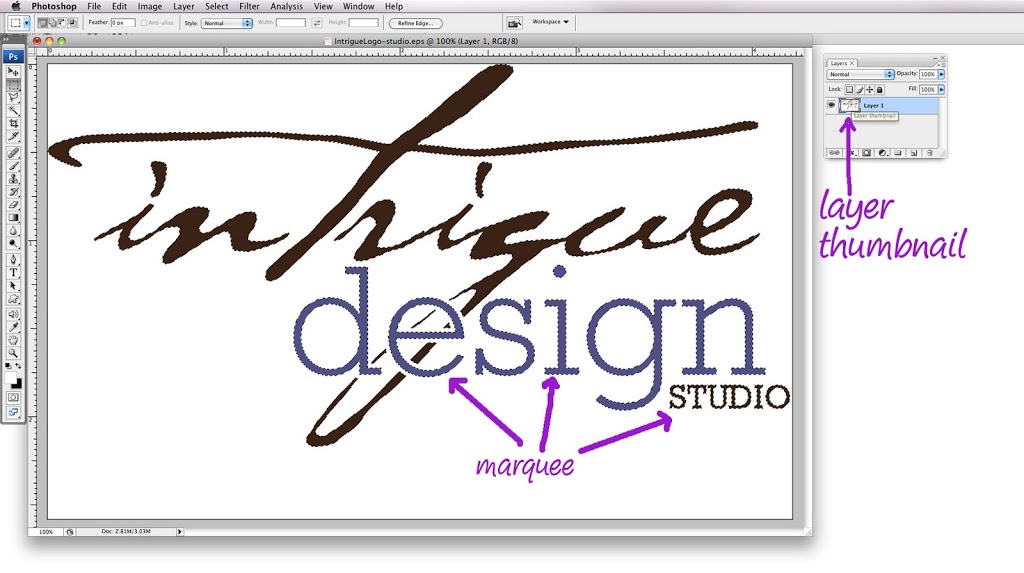 4) Press the letter ‘D’ so your foreground and background colors (shown in your Tools palette) revert to black and white. Hold down the option key while pressing the delete key (or Edit->Fill – Black) and the selection should become all black. Do not deselect the marquee. If the marquee disappears just bring it back using the command key + click on the layer’s thumbnail again.
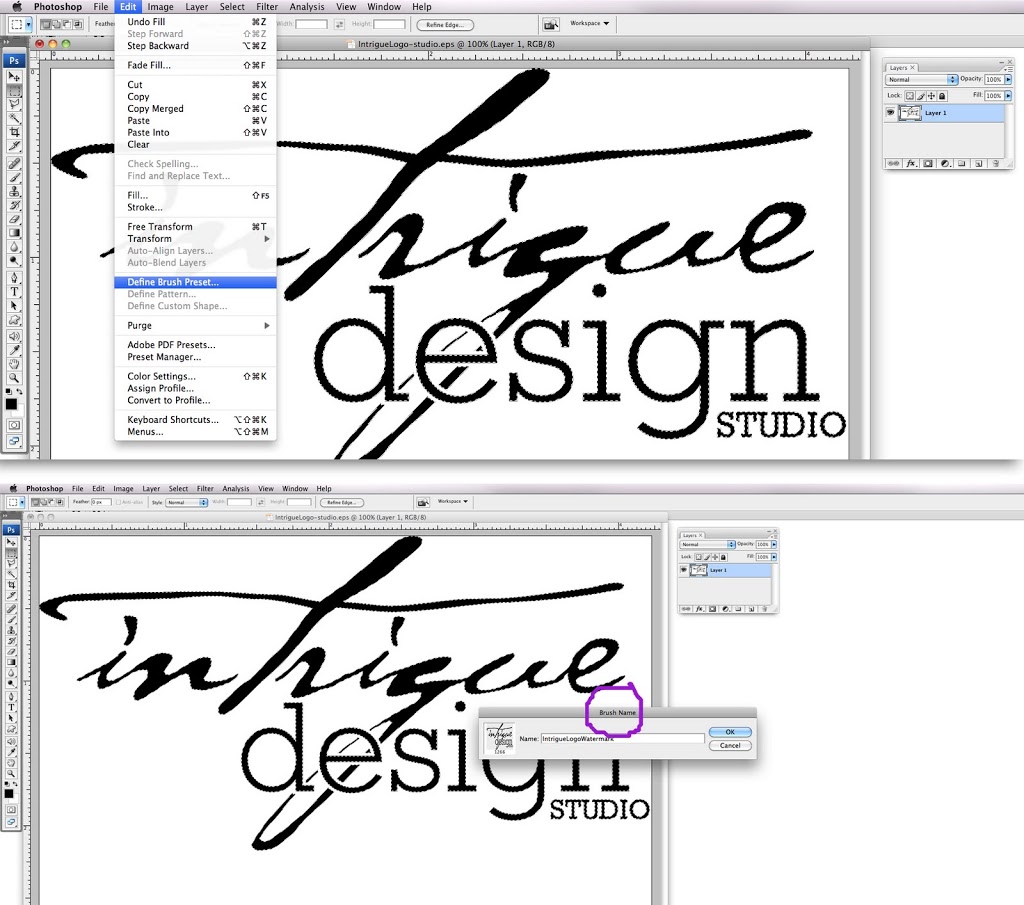
 5) In the Edit menu choose the option “Define Brush Preset…” It will ask what you’d like to name the brush. Choose “Save” and it should now be saved in your brush palette for future use.
 To confirm this select your “brush” tool from the Tools palette, open the brushes palette and scroll to the bottom of the brushes. You should see it in the last position.
 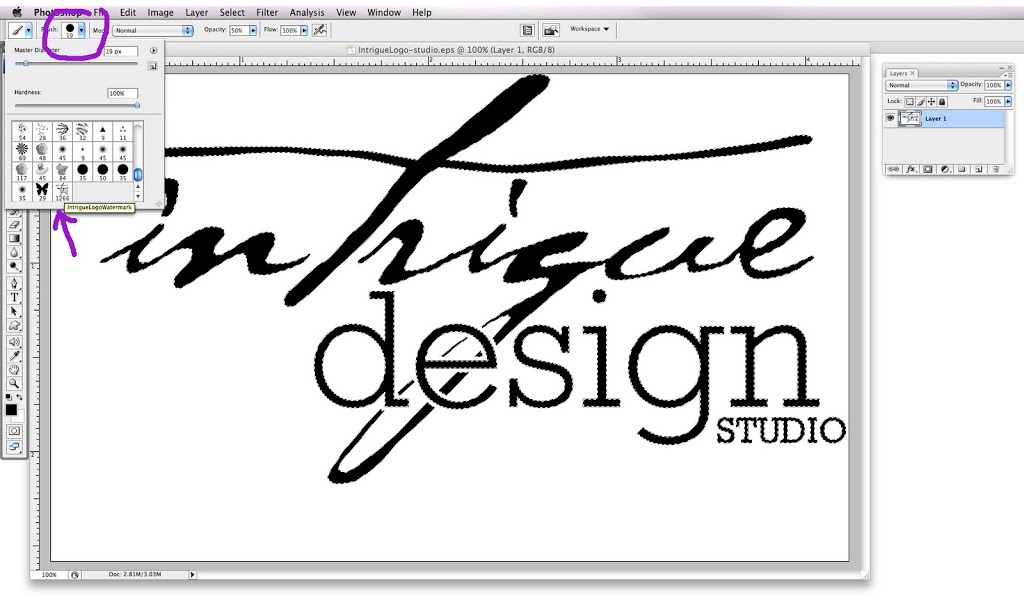 6) Close this document, saving it if you think you might need it again another time.
7) Now for the fun (easy) part. Open the photo you’d like to watermark. Click on the brush tool, choose the watermark brush from the brushes palette. 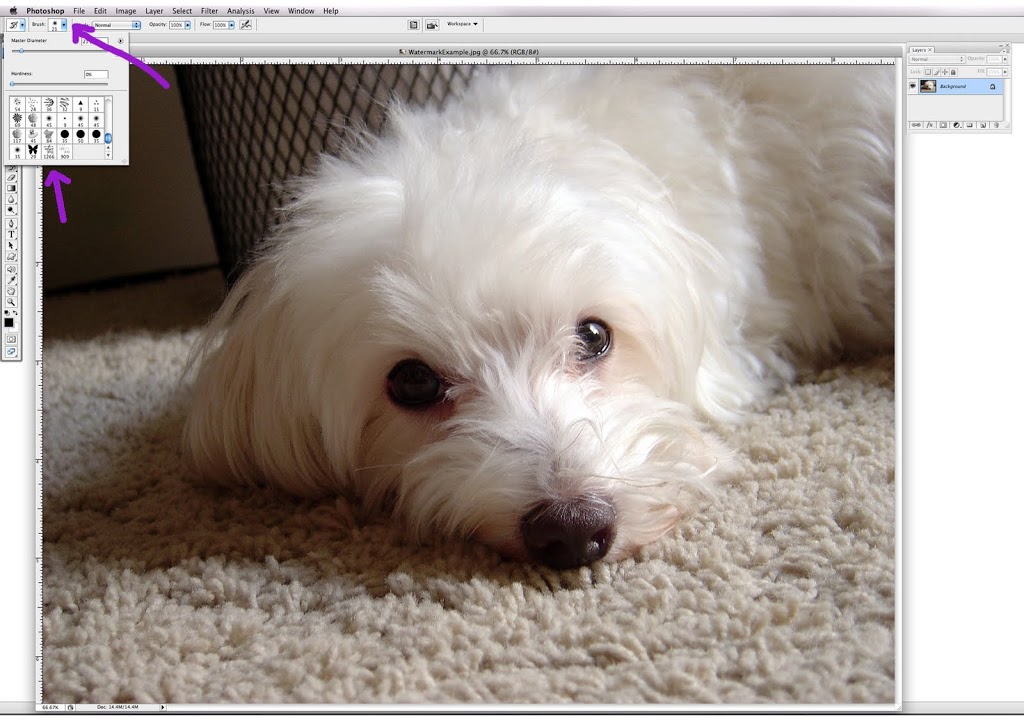 At this point you have many options. Would you like the watermark to be solid or see through? I like it at about 50% opacity, depending on where I’m using it. You can change this by either typing in numbers (5-0) or use the opacity box right below the menus. Do you need the watermark larger or smaller? You can use the left or right brackets: [ ] to make the ‘brush’ larger or smaller in order to fit the space you have. You can even choose a different color to use as you please (I like white if it’s on a dark background, or black/grey if on a light background.)
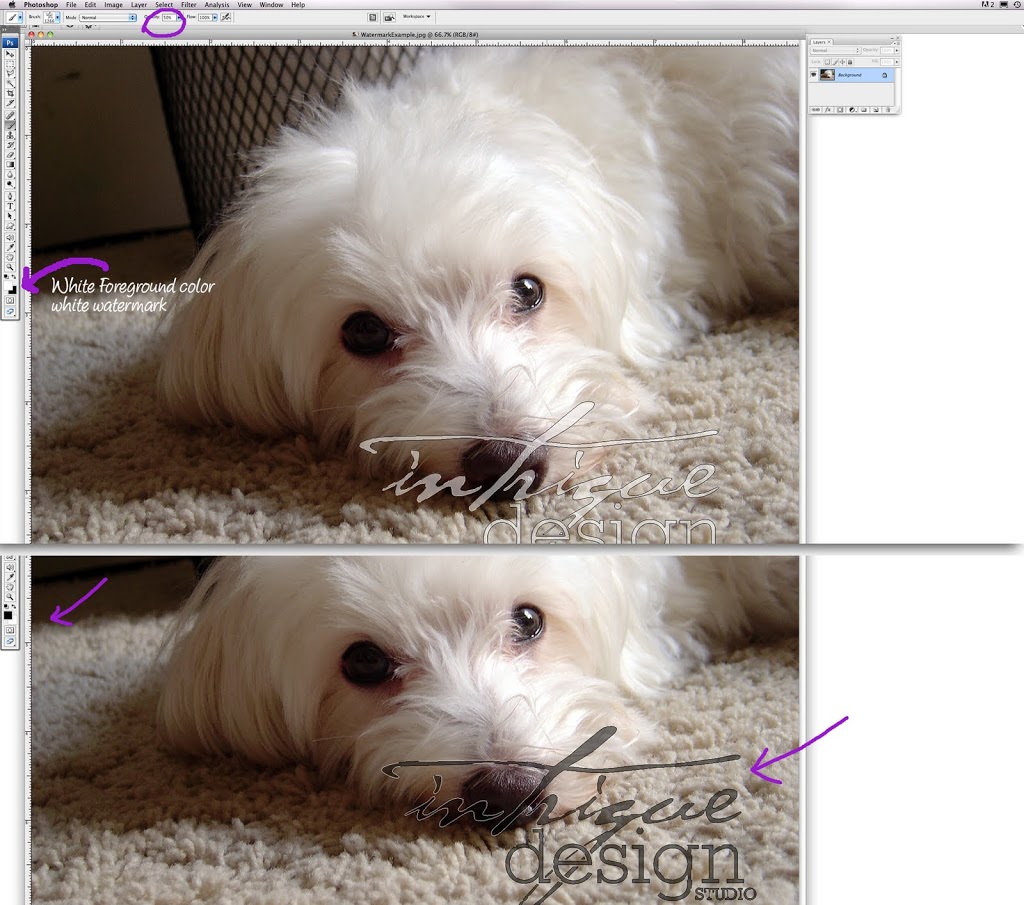 ‘X’ is the key command to toggle between the foreground and the background colors.
 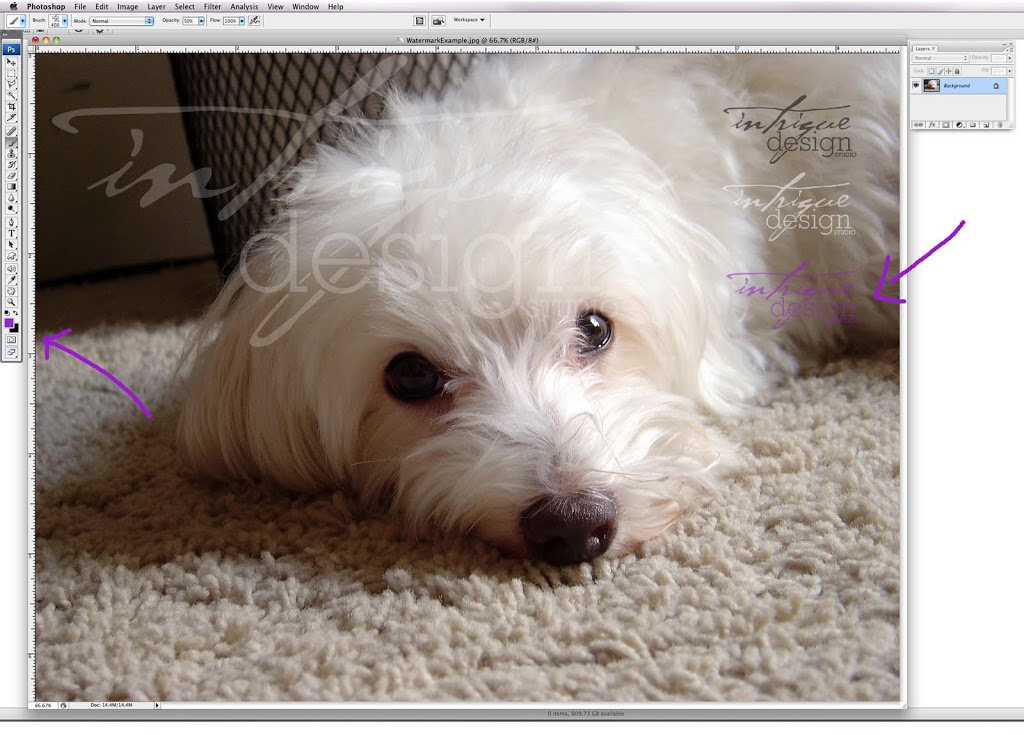 You may now SAVE your watermarked file in whatever format you wish.
 Stay tuned for Part 2 where I’ll show you how to make a brush out of text and more.


Oh yay! This was super helpful, I’ve been wanting to make ‘brushes’ and just hadn’t taken the time to figure it out.
I just wanted to say that I did this on my PC, the only variation for me was- instead of using the option delete shortcut for changing the colors, I clicked the ‘create new fill or adjustment layer’ icon on my layers window and selected black and white. Everything else was spot on:) Thanks!
Hi Carmen. Thanks for making that comment. An easier way to get around the shortcut would be to choose Edit–> Fill. That’s what the shortcut is – replacing the current color, unless you want another layer so you don’t change the actual layer. Another shortcut I use for the same thing is Shift+F5. Brings up a box that you can then make choices in. Again, this alters the actual layer so you don’t have a bunch hanging around. Thanks again for commenting!
Very helpful post!
This is GREAT and you know what I would really want… is to be able put a bunch of files in a folder and just run an action to do it. I played around with it but never got it to work quite right….